Friday, August 9, 2013

First Birthday Party Construction Theme

Thanks to pinterest (once again) I was determined to create a construction theme for my son's first birthday party!  I am pleased to say, it come out just I had hoped!!! Here is the appetizer table.
Luckily from my older son, I already had construction trucks and the signs all came from his old bedroom wall.  Caution tape came from the hubby's truck!!! Shhhhh....


At the cake table, I displayed my home made invite, pictures of James at 1 month, 3 months, 6 months and 9 months. Each guest can take a lollipop favor with a sticker that says Thanks and James's First Birthday on it, printed by me!! Lollipops came from amazon.com in yellow and orange swirls.  Each kid took home a construction hat wtih their name on it, printed on stickers, by......ME!


 Here is my favorite part, the cake!!!  Having boys around it's very easy to find props for this kind of theme!

 I also used crushed oreo cookies, and turtle sprinkles from Joann's (I believe) for my dirt piles.
Cupcake liners from Joann's and I printed stickers with clipart from Microsoft word and stuck them on yellow and red cardstock and punched out circles and glued them on toothpicks for the toppers

This is the cupcake that James got to tear up!!

 For my older son, I had a one year old picture taken and had everyone that attended the party sign, as a guest book.  So I did the same for James. But instead of going professional, I took the pic myself, not bad, right!?

Thankfully the birthday boy approved!!!!


Tuesday, June 4, 2013

DIY Wedding Sneak Peek

My wedding is coming up in August, it's going to be a small gathering of close family and friends and we can't wait!!  If you know me at all, you know how I love to do everything on my own!  I am a serious DIYer.  So my wedding is no place to skimp out.  I do not want to give away the whole thing to those of you that are coming, but I'll give the others a little sneak peek!
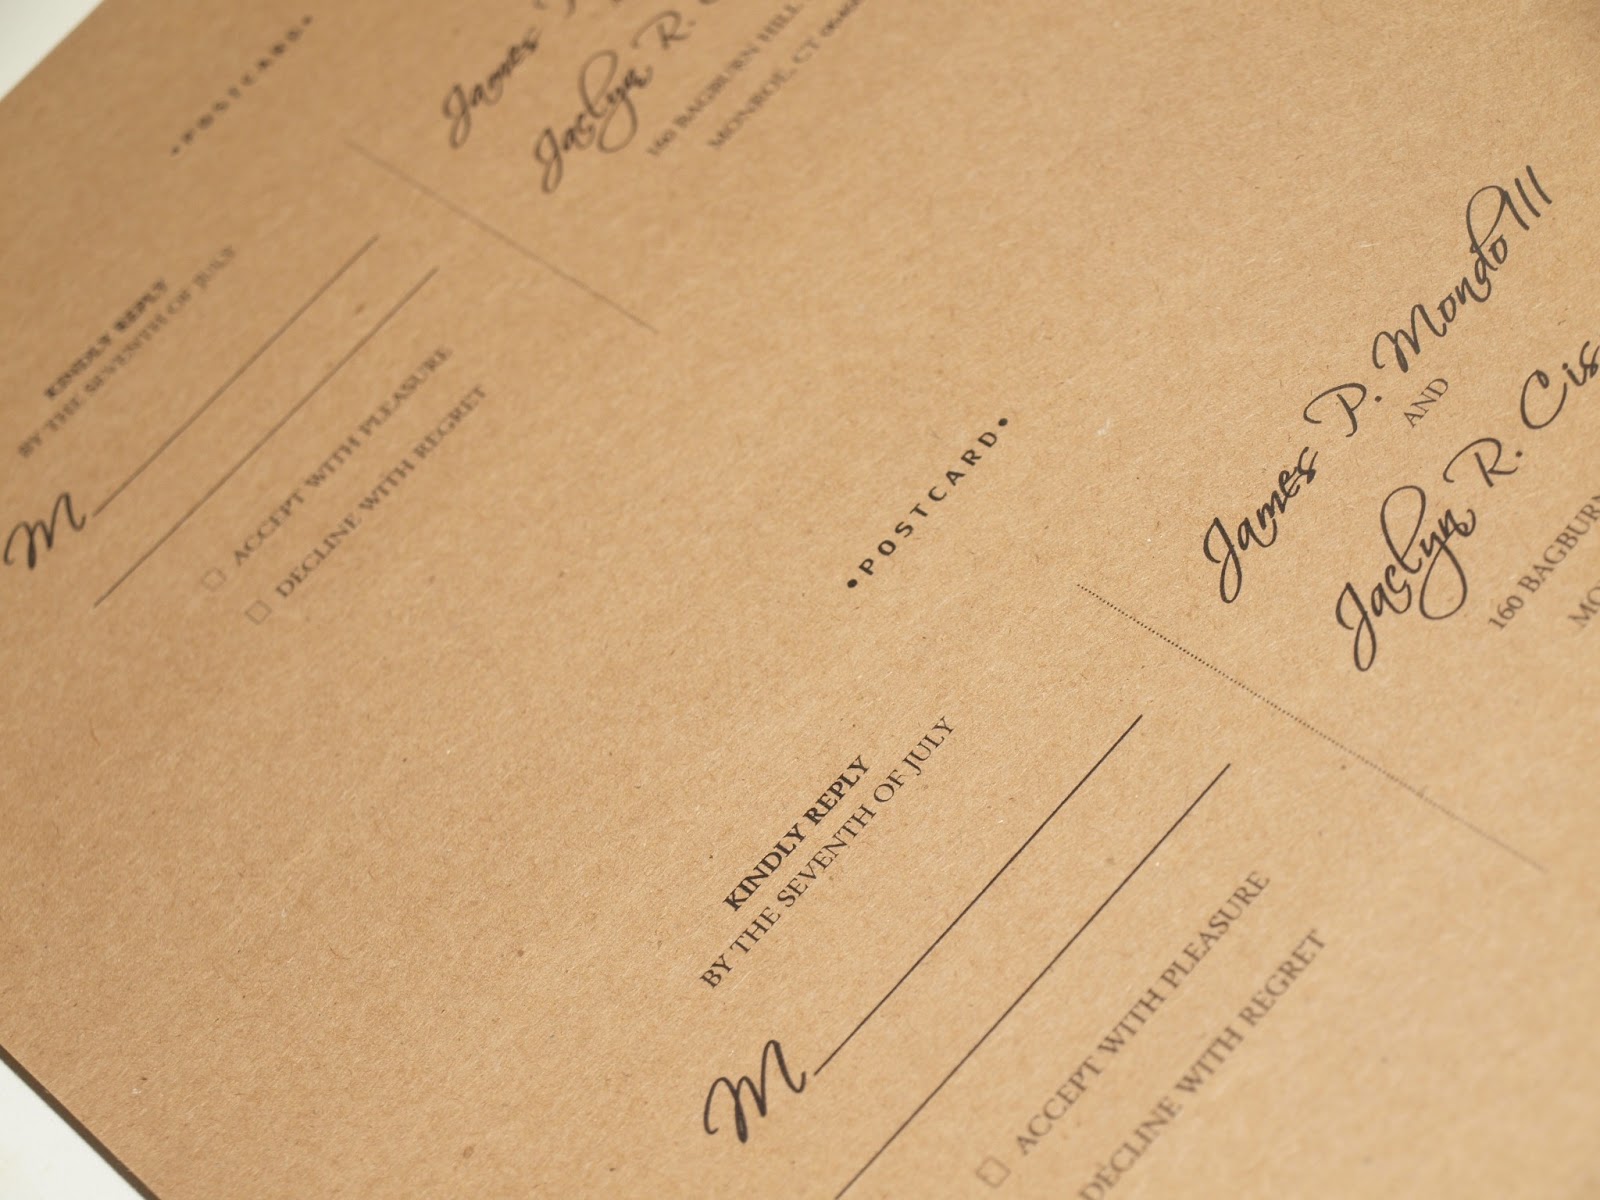
These are my invitations, I am a plain kinda gal, I love the dull look with a little color.  I purchased my card stock from envelopes.com in the color - brown paper bag.  I did have to figure out how to print and cut and everything in order to fit in my envelopes that I bought from envelopes.com too.  They were white linen, and I addressed them all my self in a self taught sort of calligraphy.
Here are my Postcard replies!
Found a wedding party app to have the guests take pics and share with us! (Thanks Pinterest!!)
I found these frames at Michael's Arts and Crafts for $1.00 and cut some scrapbook to fit them and will put a couple pictures of me and the hubby to be
While he was out making a new mailbox post he had some extra wood laying around so I asked him to cut a few cubes for me.  I tea stained each block and used my sharpie paint pen to write Mr. & Mrs. on them 
Found these chalkboards at Michael's Arts and Crafts and I tea stained the frame and used my cricut to cut the numbers out of white vinyl.  These will be the table numbers.  I bought the stands for about $1.00 at the Christmas Tree Shop....Don't you just love a bargain
Who doesn't love a good mason jar!?  Especially when I have about 1200ft of rope laying around that I can wrap around the top.  
Found this lovely box at a Antique shop and used the cricut to print out my banner
Since we are having a private ceremony with a few guests, these will be what we hand out.  Sort of a "program" if you will, but also a fan since we will be outside in the heat!  I found the idea on Pinterest and I chose the fonts and then found a pack of off white cardstock lying around that I printed them on.  I also found popsicle sticks lying around that I tea stained. I then ripped up some fabric I also had laying around and tied a little bow, and VOILA! (Thanks again, Pinterest!!)

My favors/place cards, I cricut cut the tags out of black cardstock and tied some twine and attached them to mini lanterns that will all be lit with the LED light inside purchased from Save-on-Crafts.com (amazing site!) and with my white gel pen I attempted to hand write the names and when I figure out that table they will be at I will put that too!!
I also bought this barrel at the antique shop that will be filled with some flowers.  Isn't she a beauty!
I can't wait!!


Friday, March 1, 2013

Spring Decor...DIY for cheep cheep!!

I was at Target today and who doesn't love those dollar bins?!  I'd be lying if I said that I didn't!  So since spring and Easter is right around the corner I was looking for anything that might be good in an Easter basket or maybe cute around the house.  I love to decorate for the seasons or holidays!  So I found this square, unfinished box...  Now I didn't get a chance to take a picture cause I was to excited to do what I had in mind.  Then I found this bag of fake eggs (green, my favorite but they also had yellow, pink, and blue) with raffia.  I bought 2 bags of eggs and the box for three bucks and this is what I ended up with .....
I love it!!  What I did to paint the box was, I took gray and white acrylic paint and dry brushed some streaks on each side.  Nothing fancy, just brushed random spots (still seeing the raw box everywhere else).  Then I boiled some water and added a few tea bags.  I painted the tea on over top of the paint and raw parts of the box.  After that dried, I took my steel wool and vinegar mixture (which I always have a stash prepared {it has to sit for like 12-24 hours} cause who wants to wait) and I painted that over the whole box and let it dry.  I sanded each side quickly and threw the raffia and the eggs in.  I had some white fabric left over in my fabric stash and I ripped a piece of that off and tied it around the box.  I think it's adorable!!!  So go grab the stuff at Target before it's all gone!! Heehee!!

Sunday, December 9, 2012

School Days


So here's a scrapbook that I started last year, I really put a lot of thought into this because as much as I would love to have this great scrapbook with all pictures and all;  I know I would never keep up with it.  I get bored after awhile.  So my thought was to just do a scrapbook with Jacob's school pictures.  This way I can keep them all nice and be able to show him when he is older and his girlfriend comes over.  Just kidding, Jacob will never have a girlfriend I won't let him.  See..
.
This is displayed clearly for all to see in his bedroom!!  Haha!  I'm only teasing, I just thought the picture was cute to hang in his room.  I know my little boy will grow up one day.  But let's not talk about it!
So here's the scrapbook, I still haven't found a pic to put in the opening on the cover.
I only have 2 pages, since Jacob has only been in school for 2 years.  So it's kind of a bummer to wait till October of each year to get to do a page.  And once I get the pictures in, I've completed the page the next day.  I have no patience, unfortunately.  So in the meantime I fill my time with other creative things to do!!
Now I just realized that on the 2nd page I never wrote the kids names in the little area I left for it on the bottom left. I have some people in my 1st grade that I don't remember their names for the life of me.  So when Jacob looks back hopefully he'll appreciate it!!!
Yup there I am on the last chair on the bottom, with the awesome tan!!
So how'd I do with my first blog!?  That was fun.  I have so many more things to show so check in again soon!! xoxo!

A bedtime prayer


Kids obviously work well with routine.  I have had a bedtime routine with Jacob since he was born.  When he was an infant I would give him a bottle and sing a song or two said our prayers then off to bed he went.  Now that he's a little older, I will read him a book or two, say our prayers, I will lay in bed with him for a few minutes and then he's on his own to fall asleep, which happens pretty quick since he's no longer a napper.
Before Jacob was born, I wanted to make up a simple prayer that we would say every night and that eventually he would learn so we could say it together.  This is the prayer that I came up with and we have been saying for a little over 3-1/2 years now.  Hopefully he will remember it forever!!

Dear God,
Thank you for this wonderful day
And keeping me safe while I play
Be my guide through all I do
And look out for my friends and family too
Whether tomorrow be sun, wind, snow or rain
Please help me to remember to praise your name
In Jesus' name we pray
AMEN!


Sew what...


I was in my favorite store Joann Fabrics the other day and I happened to walk past zippers.  So I thought to myself what can I do with these....
  And this is what I came up with!  I made a couple of other little credit card holder/change purses before that had a fold over velcro flap, but a zipper is so much more secure!  And really it's very easy to do, it may be a little harder to explain.  Here's what you need...
Sewing machine (& thread)
Cutting mat/Ruler
Rotary cutter or scissors
material (I used the packs that are already cut for $9.99)
6" zipper (in what ever color you choose)
                                                                               Ribbon (to match
                                                                               material)
                                                                               Key chain
                                                                               Seem ripper (we all
                                                                               make mistakes!)
Cut your chosen material 6" x 8".  Place the printed sides of both materials facing each other, and sew (1/4") one of the longer sides together.  Now on the other side about 2" down you are going to want to put your ribbon to hold the key chain.  The loop is going to be facing the inside of the material (it sounds backwards but just follow along).  Leave enough ribbon because when you are all done sewing the ribbon is going to be about 1/2" smaller then what you left for the key chain.   Sew that side now while holding the ribbon in place.   Turn the material inside out and iron, this way it lays flat and it's easier to work with.
The 6" zipper is going to be a little too long, so place the zipper (upside down) against the edge of one side of your material (the excess material will  hang over) sew right along the zipper.  Fold the material so you'll now be able to sew the other end to the zipper.  You're project, so far should look like this.  Does it?
 
Now pinch the top together, tucking the zipper between the sides of the coin purse, also tuck the ribbon in too. Sew the end of the zipper edge  (1/4") from the end all the way up over the zipper track (go back and forth over the zipper track a few times.)  Cut the excess off.  Unzip the other side, so you can sew the other side without the actual clunky zipper being in the way.  line up the zipper track and make sure the ribbon is tucked in and now sew along that edge.  Right up and over the zipper track.
Flip inside out or outside in and there ya go!!  All you have to do is add your little key chain .  If you wanted to, you could add batting in between the two pieces of material, it would make it a little bulkier and stiffer.  I liked mine light and simple, and besides, I didn't have any batting.  And you could also make the coin purse bigger.  Just cut longer and wider material.   (7" x 9", 8" x 10" etc.)
Mine is on my keychain right now and is holding Jacob's daddy's credit card!!! Shhh!  Just kidding, he knows I have it, I had to return something!!  But now I don't have to search through my big bag for it, it's right there hanging on my keys!
Hope you like it, and hope you give it a try!!  Let me know how it comes out!

Puzzles


I don't remember where I got this idea, but I made a few revisions to it and made it my own!!  Jacob has plenty of puzzles to do but I thought that doing it this way....it'd be a little more fun!!  I took this picture...
Printed it from my computer (8 x 10) glued it onto a piece of construction paper.  I bought laminating sheets and laminated the whole thing.  Now I used my scissors to cut puzzle pieces out of the picture.  I did larger pieces cause my son is younger, but you can do any size you want, depending on how challenging you want it to be.
After I had all my pieces cut out.  I flipped them over (the construction paper side facing up) and put little pieces of velcro on each puzzle piece (the spiky side of the velcro, not the soft).  I have a piece of felt that I attach to Jacob's easel (that also goes along with a bunch of little felt people and outfits that a cut out, but we'll get into that another time!!) and now we can put the puzzle together on his easel! See...
                          
I bought little plastic envelopes from CVS and I store the pieces to each puzzle in a different one.  This way you stay nice and organized ;)
 You can even go as far as printing another copy of the picture in a wallet size and attach it to the outside of the envelope so you know which envelope holds which puzzle.  I think I might actually do that!!!!
Happy puzzling!!